Thursday, June 30, 2011

Come to our Wedding: The Deets

A sneak peek at a few of the details in our invitations. A full reveal coming up soon!
Lindsey and Ashley cutting strips of paper for the squares on the front of the invites!
My mom working hard to get the small green squares stuck on the larger emerald/teal squares!
I used my Cricut to cut out Rs. I went through a few different font choices, but ultimately decided on George. We used the R, but bolded to give it a little more width.

The finished product! The Rs gave my sister so much grief. I think these really made the invites, though. Otherwise, it would just be a blank pocketfold on the front!

Another element that made the printed part of the invite stand out was the matting behind it. I chose to buy them pre-cut from Cards & Pockets instead of cutting them myself. It amounted to about $.17 per invite, but I think it was worth it.

Lindsey lining up the mats and sticking them with photo mounting squares! I think we went though about 7 boxes of squares throughout the process of invite construction.

The finished pocketfold, just waiting for inserts and an invitation!
Tomorrow, I'll walk you through the entire invitation :) I'm pretty pleased with them, and SO grateful for all the help from family members!

What details did you want to incorporate into your DIY project?

Wednesday, June 29, 2011

Come to our Wedding: Wrap Arounds! (With Instructions)

I knew that I wanted wrap around address labels from the very beginning. What's a wrap around, you ask? Well, it's simple: Instead of the mailing address and return address being shown on the front of the envelope, they are on a strip of paper that wraps around to the back of the envelope, so the return address does not show on the front. 

The journey of my wrap arounds is quite a long one. It all started the day after Thanksgiving, when I scored this stack of paper at 50% off at Michaels:

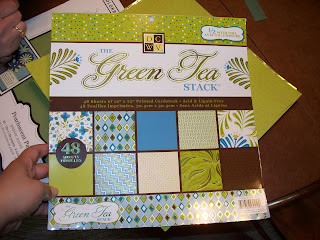
The green is much more green in person. To me, this look very yellow, but it could be my monitor.
 Now, if you're keeping track, Josh and I weren't even engaged at that time (we got engaged 2 days later), but I still knew this paper would come in handy when we made our invitations. At first, I thought it would be for envelope liners, but then I put the ka-bosh on those, and the paper became the background for our wrap around labels!

I went through countless drafts of the best way to make these labels, and at one point, I almost gave up. I couldn't figure out how to get the return address to show up vertically with the mailing address horizontal when they were both on the same label. So, after about three weeks of experimenting, I decided that the easiest thing to do was to put them on 2 different labels. Makes sense huh?

So, here are the directions for how I did my DIY wrap arounds:
(I apologize for some of the pictures/captions being cut off... I wanted bigger pictures so you could actually see what I'm talking about, but my blog doesn't expand to hold them. So sorry!)

1. Cut any pretty patterned (or solid would work too, I suppose) into strips that will fit your envelopes. I chose to cut mine in 6" by 2" strips, so I could get 12 strips from each piece of paper with no waste. 
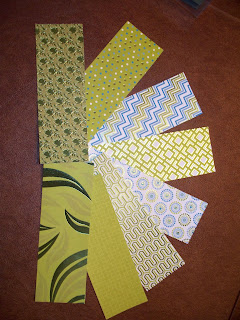
All of the different patterns that adorned our invite envelopes!
2. Decide what size you want your mailing address labels to be. I tried the standard size mailing labels (I think they're like 1" by 2.33" or something) but it just didn't look right. So, I decided to make my own by purchasing labels that were a full sheet of adhesive paper. I chose to make my labels 1.5" by 2.5" so the paper would show on all sides.

3. In Microsoft Word, you'll have to make a document with your custom sized labels, which is super simple to do:
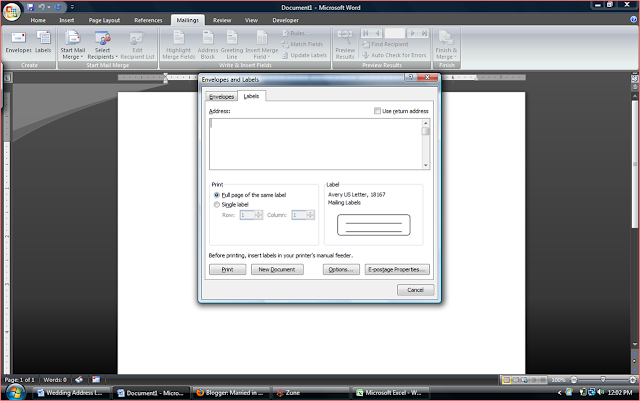
Go to the Mailings tab and select Labels, then select Options from the dialogue box.

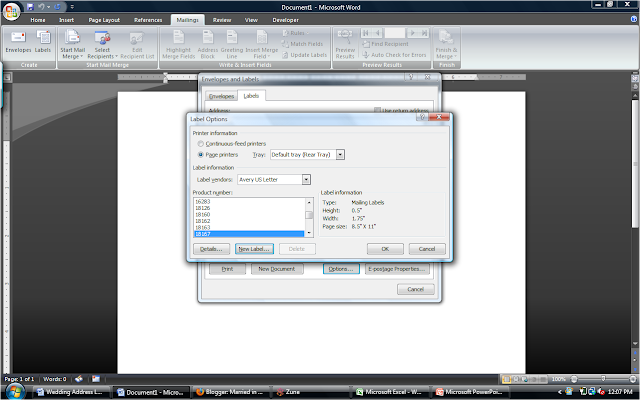
Select New Label in order to add a custom size.

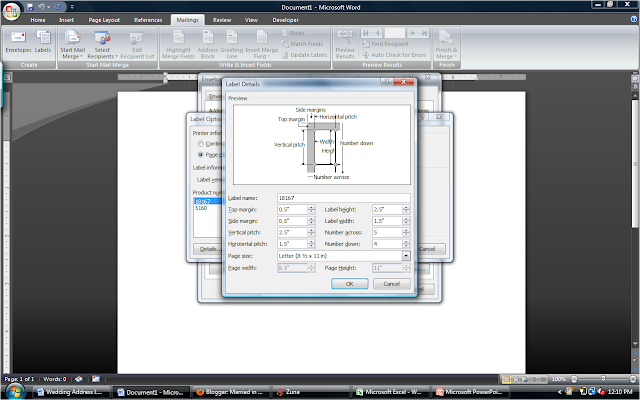
Enter your dimensions. Remember - Pitch is the measurement from the top (or side) of one label to the top (or side) of the next. I recommend making this the same measurement as the actual label you're creating, or else you'll have to trim it off later.
4. Then, keep choosing OK until you're back at your document, which should have dashed lines for where your labels are. Now, set your text orientation:
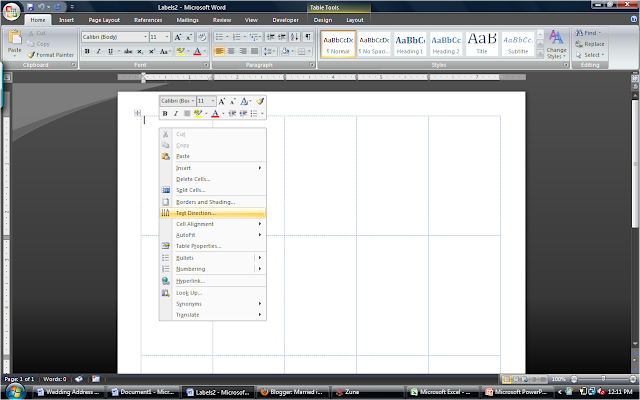
Once you have your document, you need to change the text orientation so it's vertical. (To avoid this, you need to set your paper to Landscape orientation, and then switch the height and width measurements of your labels. Whatever is easier for you)

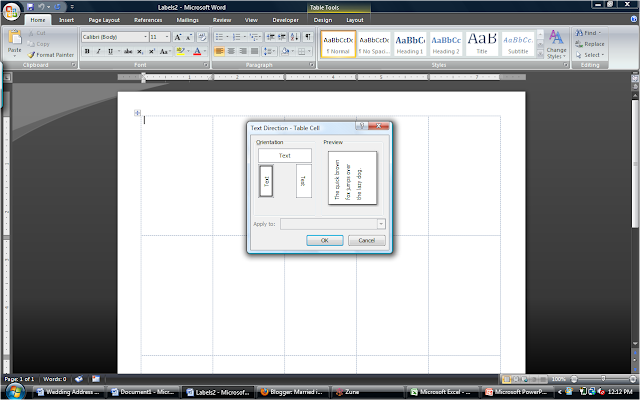
Select the text orientation on the left, and you're good to go!
5. Input your addresses! I chose to do a mixture of fonts and colors, but it's completely up to you.

6. When they're printed, you'll need to cut each label out. I hate cutting straight lines, so I used a cricut paper cutter with a sliding blade (I don't have a pic :( ). Then, attach your mailing labels and return address labels to opposite ends of the paper strips you cut in step 1.

7. Using your favorite type of adhesive (I used photo mounting squares), attach the labels to the envelope, wrapping the return address portion around to the back. Mine wrapped around about an inch, but it's completely up to you!
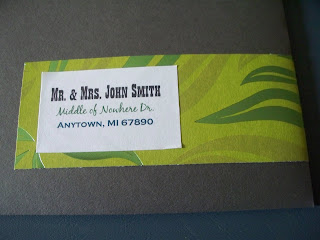
Finished product! Unfortunately, I didn't snap a pic of the back of the envelope. Trust me, the return address is there!

Was there any DIY element you couldn't figure out how to do? How did you solve the problem?

Monday, June 27, 2011

Real posts coming soon...


The good news: I found my camera! (Right where I left it... funny how that happens.) The bad news: I haven't posted anything in FOREVER! And I'm super busy right now trying to figure out where to put all my goodies from my first bridal shower, so I'm leaving you with this: My favorite thing from the shower. My flower girl, Grace, drew this for me! Isn't it amazing!

Regularly scheduled posts coming soon!!

Monday, June 20, 2011

A Picture-less post

This post will not have a picture. Why,  you ask? Simple: I can't find my camera. I had it last night when we left Josh's parents' house, and now it's gone. Vanished. Right into thin air, I tell ya! Which is a major bummer because I have the most adorable pictures to show you and to explain why I was MIA for a good portion of last week.

Alas, you will just have to trust me and know that it was for a really reason. A really cute, crafty reason. And I'll post pics the moment my camera decides to show its face (or lens?). Actually, I want a new camera, so as long as I find my memory card, I couldn't care less where the camera itself is. But I digress...

So, today is June 20th. Do you know what that means?

(Time out: Every time I ask Josh what the date is, I think he thinks it's a test of whether he remembers important dates, because sometimes he looks a little panicked and takes a minute to respond. Most of the time, I honestly just don't know what day it is. But it's kind of funny. Time-in)

We have 2 months until our wedding.

2 months, people!!

Holy cow, how did the last 7 months go by so fast? Seriously. And the next 2 are going to go by even faster! I've got 2 bridal showers and a bachelorette party, plus all of the loose ends to tie up. Thankfully, my family and Josh's family have been awesome at helping out. Otherwise, I would be pulling my hair out by now. And bald just isn't a good look on me. Even with a veil. 

So, what's new with you?

Wednesday, June 15, 2011

Rainy Day Fun

Today was a kind of gloomy day here in the Middle of Nowhere. A nice springy day with a low temperature and afternoon rain shower was the perfect day to work on invitations. So, I assembled the troops: my mom and sister, Josh's mom and sister, and even Josh (for a little bit). We cut, Cricut-ed, fought with glue dots, made Wal-Mart runs for more sticky stuff, assembled, and stuffed. With the help of some amazing breakfast muffins and some thin crust veggie pizza, we managed to get about 60% done! All that's left now is attaching the actual printed portion (they aren't back from the printer yet), addressing, and stamping them!

I must say, between the laughing and snarky remarks about my choice of invitation process, we had a lot of fun!

Apparently my mouth does funny things when I'm concentrating

My mom said not to put her on the blog. Shhh... don't tell her :)

Sister Lindsey cutting strips of paper for the wrap around labels!

My future in-laws peeling and trimming the Rs that didn't quite cut all the way through on the Cricut

Lindsey glued an R backwards... it was quite funny, but I guess you had to be there.

Not happy with the job of gluing Rs onto the green squares of paper. And probably not happy that I snapped a pic :)

When he got out of work, Josh helped glue and stuff, too! He was actually enjoying himself. No, really, he was!

I'll post details about each little mini-project that went into the invites, but that's another post. I'm so ready for the printed pieces to be put into the envelopes, and I can't wait to see how our wrap around mailing labels turn out!

What's your favorite thing to do on a rainy day?

Monday, June 13, 2011

Just another Manic Monday...

...ahhhh. Nothin' like a little bit of the Bangles to get your week off to a good start :) (If you don't know what I'm talking about, wikipedia The Bangles and/or download Manic Monday. And Eternal Flame. And Walk Like an Egyptian. Good stuff)

So, normally Mondays are all blahhhh and stuff, but today was actually pretty awesome. First of all, I slept in. SCORE! And then I finished watching what I DVRed of the Tony Awards. (I love me some Neil Patrick Harris. We go wayyyy back, seriously.) Then, I got the mail and saw this:
The invite to my first bridal shower, hosted by Josh's sister and mom! It's a recipe shower, so the invite also contained a recipe card so people can give me some of their favorite recipes!

Then, I got a phone call. My bridesmaids' dresses came in! Within 3 hours, I was there with Josh's sister in tow. The dresses are even more beautiful than I remembered. It's so hard to envision a whole dress in one color when all you can see is a small swatch! Here are a few pictures of my sister and  Josh's sister, modeling the dresses in front of some of Josh's mom's gorgeous flowers!


My sister, Lindsey, even brought over her accessories over to see how they look with the dress. I LOVE the peacock feather earrings! And the colors in the bracelet are perfect. I'm excited to see what accessories my other girls come up with.


Lindsey and Ashley even got matching shoes! The gunmetal color looks perfect with the color of the dresses. 

And of course, it's Mingle Monday over at Life of Meg! I found a few new blogs to follow, which I always love!


Mingle 240 
 
So, how was your Monday?


Friday, June 10, 2011

Dressin' the Guys [Part 2]

I've got a riddle for you: What do you get when you cross a bonfire, 5 groomsmen and a groom, a bunch of beer, and formal wear? Answer: A bunch of half-drunk, half-naked guys in your living room at midnight!

Josh and I invited the groomsmen over to try on their outfits (I know there's a better word for it, but outfits is just so cute), and enticed them with the promise of a bonfire (BYOB, of course). I envisioned everyone trying their outfits on one by one in the bathroom before we started the fire, and then once everyone was fitted, we would commence the burning and boozing.

Silly me. That vision was wayyyy off!

What happened was this: The guys started the fire, and also started drinking, around 8:00 PM. Then, around midnight (I think) when I reminded them (after one bottle drink of wine) that they still had to try on their clothes, everyone moved into the living room. And started stripping. It was definitely the first, and probably only time that there have been that many half-naked men in our living room. There were arms up the the air, and too many pairs of boxers to count. But everyone tried on their stuff, and I only ended up having to exchange 3 things. Out of the total of 24 pieces, I'd say that was pretty good!

I didn't take any pictures while they were undressing, but I did manage to snap a few of the finished product:
Groomsman Gary helping Groomsman Eric with his tie
A wider shot of the same action - ties being tied and vests being adjusted
Groomsman Brandon checking out the finished product...


And deciding it looks pretty good!!
It was a pretty fun night, even though it didn't go quite as planned. Hopefully the guys are appreciative of the fact that they don't have to wear tuxes in 90 degree weather!

Any unexpected fun times (bonfire and booze optional) in your wedding planning escapades?

Thursday, June 9, 2011

Dressin' the Guys [Part 1]

Almost from the start of our wedding planning, Josh and I decided we didn't want the guys wearing tuxedos. We came to this conclusion for a number of reasons: 1) August in MI is freakin' HOT and HUMID, 2) The guys would probably only wear the jacket and/or vest for the ceremony, and then strip to keep themselves cool 3) I like the look of menswear vests with white shirts and colored ties, 4) The guys could actually keep these ensembles instead of paying to rent them.  I was really pleased with the sales we found and glad we could find the right sizes for each of our guys. The best part? The price (which I'll share with you at the end of the post).

So, this is what our guys will be wearing:
Plain white shirt from Kohl's
Charcoal vest from Macy's

Gray pants from Kohl's

Green tie from thetiebar.com
Josh will be wearing the exact same, but with a blue tie instead of green. We couldn't find anything turquoise-y that we liked, so blue is what it's going to be!
Blue Tie from thetiebar.com


The best part: It's costing our guys $80 total, and they get to keep them! I'm excited for pictures of our guys all together - I SWOON over pictures of groomsmen in coordinating vests :)

What's a bargain you've found lately that just made your day?

Wednesday, June 8, 2011

KB Photography

Check out this engagement pic shot by my cousin, Karlee! She just graduated from high school and is working on her photography portfolio because that's what she hopes to go to college for. Check out this session, as well as some of her other stuff, and leave her some love :)


Also, if you're in the Grand Rapids or Lansing area and would like a free photo shoot, she is looking for couples or families that she can take pictures of for her portfolio! If you're interested, leave her your information on her blog or email her at karlee_22@hotmail.com

Rollercoaster of Emotions...


It was an up and down kind of day Friday.

I ordered our table linens last Wednesday, and I was expecting them to take 7-14 days, like the confirmation email said. Imagine my surprise and pure joy when I checked the tracking and found out they would be here in 2 days! I was elated. The UPS truck pulled up and dropped something on our porch (I was holding the dog back, so I didn't open the door). I opened the door when he left, and my heart dropped. Look at the condition of the box! I was really nervous to open it, and actually quite surprised it was still intact.


Apparently the corners got roughed up a little in transit.

 Yes, that flap is being held on by three pieces of tape. TAPE!

 Then I opened it up to see these beauties:
Turquoise, Moss (which isn't photographing well), and, well... "Sage" green. And when I say "sage" I mean pretty much bright lime green.

I went from joy that our linens were here, to trepidation about the condition they would be in, to excitement of two of the three colors, to pure befuddlement (a new word I'm coining) about the sage-lime color. All in about the course of 5 minutes.

 I really don't want to go through the hassle of sending the lime green back and ordering a new color, so I'm hoping the color will grow on me. I do like it with the turquoise, and it definitely adds a brightness to our color palette, so maybe it will be ok, right? I sure hope so.

Tuesday, June 7, 2011

Tuesday Shoesday!

I know there are a lot of blogs out there that feature beautiful shoes on Tuesday, but this blog isn't one of them.

Until today.

Saturday I was at an art fair with Bridesmaid Jenna, and we spotted a huge shoe store that was boasting terrific sales. Shoe sales? In an air conditioned store? We were SO there!

I've been looking for wedding shoes for awhile, but I hadn't been able to find what I wanted: Peep-toe mossy green heels with some sort of adornment on the toe. All of the pairs I had found were wayyyy more than I wanted to spend, so I had resorted to the possibility of purchasing a pair of dyeable shoes and having them colored to match what I wanted. (But something about that screamed "80's bridesmaid" so I wasn't really crazy about that option.)

Jenna and I searched and searched in the shoe store, going through endless doors and finding even more shoes! Seriously, almost like a dream. When we reached the "Formal Room" I did a quick scan for green shoes, but found nothing. So, I took a look at the dyables. There were some promising pairs there, but I wasn't head over heels [pun not intended... maybe] for anything, so we started to walk out.

Then I spotted them. And literally did one of those gasps where your breath catches in your throat and people turn around to see what you're problem is.

(And I may have done a mini-photo shoot this morning with my shoes on the porch [natural light!] to show you all)

They are Caparros' Narita style, in green silk and I'm in love :)


 All pictures by me :)

I'm toying with the idea of adding some peacock feathers to them so they'll tie into my feather accents... Nothing crazy, just one hot glued underneath the bow part either to the outside of my foot, or going up the front of my foot. Thoughts? Should I just leave perfection alone?

Sunday, June 5, 2011

Another Non--Wedding post

Maybe I'll stop fighting it, and start incorporating more non-wedding related things into the blog. My whole life doesn't revolve around the wedding, after all! (Well, at least that's what Josh keeps telling me.)

Memorial Day was pretty fun around these parts. I went to see Bridesmaids with my sister and Josh's sister, and we stopped for ice cream afterwards. Have you seen Bridesmaids? It's hilarious!! It's got the humor of the Hangover but still enough heartfelt parts that it was really enjoyable. While we were in the movie, Josh was working on his parents' farm, and he sent me a text that a glider had landed in one of the fields!

We stopped by the farm on our way home, and even though it had been 2 hours since it landed, the glider was still there. It was quite the entertainment for us, and other people at the farm, for the night! The three of us (me, Josh's sister, and my sister) hopped on the farm's John Deere Gator and headed out to the scene of the action.


This is what we saw when we approached the field. The glider is kind of hard to see at this point, but we could tell there were a lot of people around it! The pilot's friends had parked their Volvo next to the field, which was probably the first time any foreign machinery had had its wheels on farm ground!

Because the field was still pretty wet, the pilot's friend couldn't get his car to the glider in order to pull it back. So, Josh's cousin used his quad to pull the glider trailer out to the field and back to the car.
Some of Josh's cousins sitting on the ranger, watching the action unfold.

The pilot. He's originally from Germany, but now lives in Canada. He had a great accent, and I'm pretty sure he had never been this close to a farm before.

Josh's cousin Quentin (and one of our ring bearers) watching from a distance.

A few of the pilot's friends figuring out the best way to load the glider.

Check out that wingspan! It was huge!

Apparently it takes quite a few people to load a glider into a trailer. Who knew?
This was such a freak occurrence! It was a fun way to wrap up a busy Memorial Day weekend!

What was the highlight of your weekend? Any freak occurrences for you?